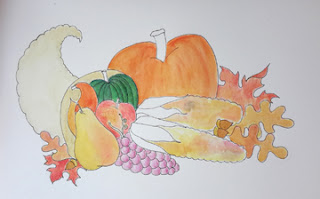
Just before we get to the 'how-to' part I'd like to give a little historical background on the title of this piece and the subject matter. Harvest Home is part of the Anglican tradition and celebrates the safe gathering of the crops. The date is movable and in years when significant events happened, like the end of a war, the service was held on a non-autumn date. In 1578 the British sailed into the far north of this continent, to Frobisher Bay, a part of what is now Canada, and held a service of thanksgiving to mark the occasion. As to why we use a cornucopia to mark a feast of plenty, the commonly accepted explanation is that Zeus had a goat as a nursemaid when he was a child and after he broke off her horn while rough housing she was granted food for life.
And now, the how-to...
 I started the process by creating a sketch and black line drawing of the piece I wanted to create. I've uploaded it as a free PDF on Moote Points' epatterns page: www.mootepoints.com/epatterns.html. I encourage you to modify it to reflect the items you generally display with your cornucopia. I'm working on 90lb Arche hot press watercolour paper and I did my line work with a .30 Rotring Isograph technical pen. Although I still use Microns for most of my tangled tiles, I prefer the density of the black ink from the technical pen for my coloured work. These aren't like the ones I remember from the past - I've never cleaned my new ones and after six months I haven't had a clog yet and they lay unused for over a month this summer while I was travelling! There is a seal inside the lid that prevents the drying problems that caused the clogs that you may be familiar with.
The next step was putting some base colour onto the drawing. In the past I tangled my pieces and then coloured them. What I found was that my line work became faded looking and that I often needed to go over it again. Now I put the vast majority of the colour work down first and only make minor tweaks after I tangle. I started with Inktense Pencils which are ideal because the colour becomes permanent and immovable after it is wetted with a brush. I start with an undercoat of yellow on my leaves and on some of the fruits and vegetables. Once the yellow is dry and start to add the other colours. The yellow underneath gives real life and vitality to the leaves in particular.
In this case I couldn't get the richness I wanted on the cornucopia so I took out my QoR watercolour pallette and added some intense golds and rich red browns. I used Nickel Azo Yellow and Quinacridone Gold. It was one of those beautiful high autumn days so I made full advantage of it and worked on the patio with lots of natural light and garden inspiration.
I had my husband make a video of the process so you could see how I work. In addition to painting the cornucopia I also demonstrated how I added some feeling of volume to the grapes with a fuschia Inktense pencil.
Once everything was dry I started to tangle and just had fun with the linework. I used mainly basic official tangles that I teach in my beginner's classes. I know there are many fancy tangles but I find that I turn to the basics over and over again and they make working on these projects so much more meditative and soothing.
Once the tangling was finished I used my inktense pencils to pull up a bit of shading and add some depth.
Now that the artwork is done I can use this to print cards and to create a background for placecards.
Have a happy and bountiful Thanksgiving whether yours is now or in November!


Looking forward to more tips from you soon! Thanks, Cherryl.
ReplyDeleteCongratulations on your cool blog, Cherryl. I look forward to seeing much more of your work. Happy Thanksgivong!
ReplyDelete